Fashion jewelry from wire
Make simple fashion jewelry using craft wire, beads, pliers, and cutters with adult help; create rings, bracelets, and pendants while learning shaping techniques.


Step-by-step guide to make fashion jewelry from wire
7 Beginner Wire Wrapping projects, Compilation, Easy, Cute, Fun and Quick!
Step 1
Clear a small workspace and lay down a cloth to keep beads from rolling away.
Step 2
Pick the wire gauge and choose the bead colors you want for your ring bracelet and pendant.
Step 3
Ask an adult to cut three lengths of wire for you about 15 cm for a ring 25 cm for a bracelet and 20 cm for a pendant.
Step 4
Slide one or more beads onto the 15 cm wire to start your ring design.
Step 5
Wrap the beaded 15 cm wire twice around the ring mandrel or marker at the size you want.
Step 6
Wrap the short tail of wire once around the band to hold the bead in place.
Step 7
Use round-nose pliers to make a small loop at the end of the ring wire.
Step 8
Ask an adult to trim any extra wire and press the ends smooth so they are safe to wear.
Step 9
Slide beads onto the 25 cm wire to make a bracelet pattern you like.
Step 10
Bend one end of the bracelet wire into a small loop with round-nose pliers to make one side of the clasp.
Step 11
Bend the other end of the bracelet wire into a simple S-hook shape with round-nose pliers for the clasp.
Step 12
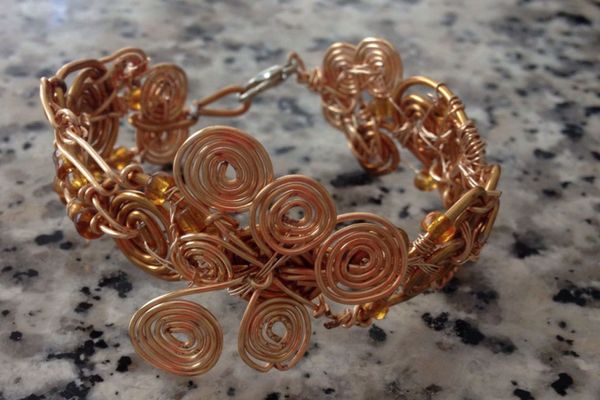
Shape the 20 cm wire into a simple pendant outline like a circle or heart using your fingers.
Step 13
Slide beads onto the shaped pendant wire and use round-nose pliers to make a small loop so it can hang.
Step 14
Ask an adult to trim and tuck any sharp ends on the bracelet and pendant so they are smooth and safe.
Step 15
Take a photo of your finished ring bracelet and pendant and share your creation on DIY.org.
Help!?
What can we use if we don't have jewelry wire, round-nose pliers, or a ring mandrel?
Use soft craft or floral/aluminum wire instead of jewelry wire, a thick marker or wooden dowel as the ring mandrel, and needle-nose pliers if round-nose pliers aren't available.
My beads slide off or the ring comes loose — what should I check?
Make sure you wrapped the beaded 15 cm wire twice around the mandrel and wrapped the short tail once around the band, then use round-nose pliers to tighten the small loop and have an adult trim and press the ends smooth so beads stay in place.
How can I change the activity for different ages?
For younger kids use larger beads and pipe cleaners or pre-cut 15/20/25 cm lengths with adult help for wrapping and trimming, while older kids can use thinner gauge wire, add extra wraps or more complex pendant shapes, and make a neater S-hook clasp.
How can we personalize or improve the finished ring, bracelet, and pendant?
Personalize them by mixing bead sizes and colors in your 25 cm bracelet pattern, adding a charm to the pendant loop before trimming the 20 cm wire, or hammering/twisting the wire for texture before photographing and sharing on DIY.org.
Watch videos on how to make fashion jewelry from wire
How To Make a Beaded Wire Bracelet - Easy Beginners Jewelry Tutorial
4 Videos
How To Make a Beaded Wire Bracelet - Easy Beginners Jewelry Tutorial

Jewelry making for beginners | 9 simple earrings use copper wire and beads
Cute Pearl Bow Earrings Tutorial | Easy Wire Wrap Jewelry Making for Beginners | DIY Beaded Earrings

DIY Wire Wrapped Stud Earrings: Easy Step-by-Step Tutorial
Facts about jewelry making for kids
🔗 Wire wrapping is one of the oldest jewelry techniques — artisans have been shaping wire into decorative pieces for thousands of years.
🧶 Beads are ancient: archaeologists have found bead ornaments used for decoration tens of thousands of years ago.
✂️ Beginner craft wire is usually soft copper or aluminum in 20–24 gauge, which is easy to bend with pliers and great for learning shaping techniques.
🛠️ Proper pliers and cutters make neat loops and clean trims and help protect fingers — always use them with an adult's help when cutting wire.
♻️ You can upcycle old wires or broken jewelry into new fashion pieces, making projects creative and eco-friendly.
How do I make simple fashion jewelry from wire with my child?
What materials do I need to make wire jewelry with kids?
What ages is wire jewelry making suitable for children?
What are the benefits and safety tips for kids making wire jewelry?
