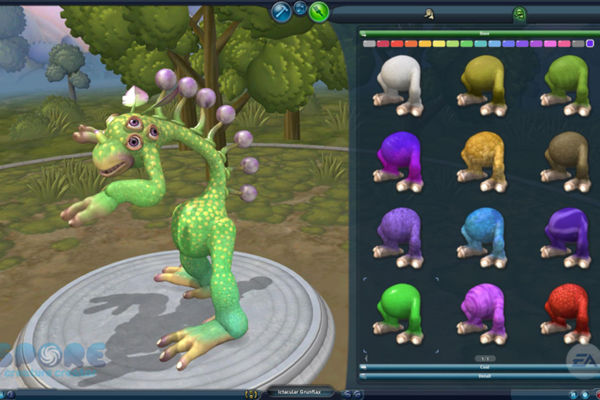
Use a character editor
Use a character editor to design and customize your own game avatar, choosing features, colors, and outfits while learning how choices affect appearance.

Step-by-step guide to design and customize a game avatar
How to Make a Character Designer in Scratch | Tutorial
Step 1
Open the character editor app or website and start a new avatar project.
Step 2
Choose a base body shape for your avatar.
Step 3
Set the skin tone or complexion for your avatar.
Step 4
Pick an eye style and choose the eye color.
Step 5
Select a nose style for your avatar.
Step 6
Select a mouth style to give your avatar an expression.
Step 7
Choose a hairstyle and pick a hair color.
Step 8
Pick the main clothing item for your avatar.
Step 9
Add more clothing pieces or layers to build the outfit.
Step 10
Change the colors or patterns of the clothes using the color tools.
Step 11
Add accessories like hats glasses or props to personalize your avatar.
Step 12
Set a pose and adjust the facial expression if the editor lets you.
Step 13
Save or export your finished avatar to the editor gallery or your files.
Step 14
Write a short note explaining how your choices changed the avatar appearance and share your finished creation on DIY.org.
Help!?
What can we use instead if the character editor app or website is unavailable or hard to access?
If you don't have the editor app or internet, substitute by printing a blank body template and using crayons, markers, or cut-out clothing to set skin tone, pick a hairstyle, clothes, and accessories, then photograph the finished paper to export it to your files.
The avatar won't save or export — what troubleshooting steps should we try?
If the Save or export step fails, try taking a screenshot of the finished avatar, check app permissions and available storage, or save to the editor gallery and then download the image file to your device.
How can this activity be adapted for younger children or older kids?
For younger children limit choices to a base body, skin tone, one hairstyle and one clothing piece with parental help to save or photograph the avatar, while older kids can add multiple clothing layers, experiment with color tools, set poses and write a longer note to share on DIY.org.
What are simple ways to enhance or personalize the finished avatar project?
Extend the activity by mixing and matching more clothing pieces and color patterns, adding custom accessories or props, exporting several poses to create a sticker sheet or short storybook, and then sharing the creations on DIY.org.
Watch videos on how to design and customize a game avatar
Character Editor BEGINNER'S Guide | Smack Studio
4 Videos
Character Editor BEGINNER'S Guide | Smack Studio
Getting Started with Character Creator 5 | Character Creator 5 Tutorial
![Make your own characters in RPG Maker easy! [Custom Assets in RPG Maker Tutorial]](https://img.youtube.com/vi/D3FPPBZzoYA/mqdefault.jpg)
Make your own characters in RPG Maker easy! [Custom Assets in RPG Maker Tutorial]

How to MAKE Custom CHARACTERS in Roblox Studio!
Facts about character design and digital art for kids
🎮 The word "avatar" for virtual characters was popularized by Neal Stephenson's 1992 novel Snow Crash.
🧑🎨 Character editors often use sliders (like nose size or eye spacing) so players can create thousands of unique faces.
👾 Nintendo's Mii system, launched with the Wii in 2006, brought easy avatar creation into millions of homes.
🎨 Mixing outfit pieces, colors, and accessories in modern games can create millions of costume combinations.
🕹️ Avatars are used beyond games — people use them in social apps, virtual worlds, and VR to represent themselves.
How do you use a character editor to design an avatar with your child?
What materials do I need to design a game avatar using a character editor?
What ages is using a character editor suitable for?
What are the benefits of using a character editor with children?
