Build a zoetrope
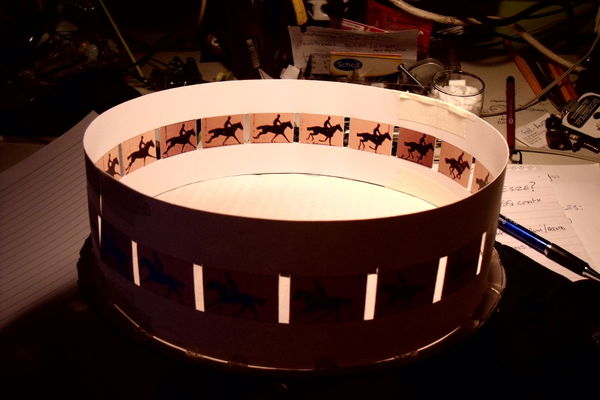
Build a zoetrope using a paper cylinder, slits, and spinning base. Draw sequential images to observe animated motion and learn persistence of vision.
About this activity
Build a zoetrope using a paper cylinder, slits, and spinning base. Draw sequential images to observe animated motion and learn persistence of vision.
What you need
Step by step
- 1
Step 1
Clear a work area and lay out all your materials where you can reach them.
- 2
Step 2
Cut two long strips from the cardstock each about 8 cm tall and about 25 to 30 cm long.
- 3
Step 3
On one strip cut 12 evenly spaced vertical slits about 1 cm long near the top edge.
- 4
Step 4
On the other strip draw 12 small side by side frames across its length for your animation.
- 5
Step 5
In each frame draw the same simple character moving a little more each time to make a motion sequence.
- 6
Step 6
Colour your drawings using the colouring materials.
- 7
Step 7
Curve the slit strip into a circle and tape the ends to make the outer cylinder.
- 8
Step 8
Curve the picture strip into a ring and tape the ends to make the inner image band.
- 9
Step 9
Place the image band inside the slit cylinder so the drawings face inward and sit near the bottom.
- 10
Step 10
Tape the image band to the inside bottom of the outer cylinder so it stays in place.
- 11
Step 11
Center the finished cylinder on the paper plate.
- 12
Step 12
Tape the cylinder's bottom edge to the paper plate so the plate and cylinder will spin together.
- 13
Step 13
Spin the plate steadily with your finger.
- 14
Step 14
Look through the slits while it spins to watch the drawings turn into animated motion and then share your finished zoetrope on DIY.org.
Fun facts
How do I build a zoetrope to see animated motion?
Cut a long strip of paper and draw a sequence of slightly different images in evenly spaced frames. Roll the strip into a cylinder from sturdy paper or cardstock and add equally spaced vertical slits around the top edge. Mount the cylinder on a spinning base (lazy Susan or a DIY axle). Spin gently and look through the slits under steady light; the images will blend into smooth motion thanks to persistence of vision. Adult help is useful for cutting and mounting.
What materials do I need to build a paper zoetrope?
You’ll need sturdy paper or cardstock for the cylinder and a long strip for drawings, pencils and markers, a ruler, scissors and a craft knife (adult use), glue or tape, and something to act as a spinning base (lazy Susan, turntable, or a cardboard axle). A cutting mat, protractor for spacing, and a lamp for consistent lighting are helpful. Optional: clear tape to reinforce slits and a pencil to test rotation.
What ages is a zoetrope activity suitable for?
Zoetropes suit children about 6 years and up. Ages 6–8 enjoy drawing simple flip-frame sequences with adult supervision for cutting and using blades. Ages 9–12 can plan frame timing, cut slits, and mount the cylinder more independently. Preschoolers can participate by drawing frames or watching the finished toy while adults handle the sharper tools and precise measurements. Tailor complexity to attention span and fine motor skills.
What are the benefits, safety tips, and fun variations for a zoetrope?
Making a zoetrope boosts sequencing and storytelling skills, introduces persistence of vision and basic animation, and improves fine motor control. Safety: supervise scissors and craft knives, secure the spinning base, and avoid loose clothing near moving parts. Variations include changing slit width or spacing for faster/slower apparent motion, using LEDs or a strobe for different effects, making a 3D model zoetrope with small figures, or digitizing frames into a stop-motion video.
Watch & Learn
Need help?
What can I use if I don't have cardstock or a paper plate?
If you don't have cardstock, cut strips from a cereal-box or thin cardboard about 8 cm tall and 25–30 cm long for the bands, and use a stiff jar lid or a cardboard circle cut from a box in place of the paper plate, using masking tape if you don't have clear tape.
My zoetrope doesn't show a smooth animation—what might be wrong and how do I fix it?
If the motion is blurry or skips, ensure the 12 vertical slits are evenly spaced and about 1 cm long near the top (step 3), the image strip faces inward and is taped near the bottom of the cylinder (steps 5–6), the cylinder is centered and taped firmly to the plate (steps 9–10), and spin the plate steadily with your finger (step 11).
How can I adapt this project for younger or older kids?
For younger children, pre-cut the two strips and the slits and have them draw or place six large simple frames (steps 2–4), while older kids can draw 16–24 smaller frames for smoother motion and add detailed coloring or a motorized spinner for steadier rotation (steps 4, 11).
How can we personalize or improve the zoetrope for a more advanced result?
To enhance the zoetrope, add more frames on the picture strip for smoother animation, decorate or tape a background scene to the inside of the outer cylinder, try translucent paper with an LED under the plate for lighting, or mount the cylinder on a battery-powered spinner so it rotates steadily before you share it on DIY.org (steps 4, 6, 9, 11, final step).