Make claymation
Make a short claymation film by modeling simple clay characters, building a small set, and photographing frame-by-frame to learn storytelling and motion.


Step-by-step guide to make a short claymation film
How to make a Claymation film! An online tutorial
Step 1
Gather all your materials and bring them to your workspace so everything is ready.
Step 2
Write a very short three part story on paper with a beginning a middle and an end.
Step 3
Draw quick character sketches that show one simple movement for each character.
Step 4
Build your set inside the shoebox and place the box open toward you on the table.
Step 5
Attach colored paper or fabric to the back of the box to make a background.
Step 6
Make small props and anchors from clay or craft bits to use on your set.
Step 7
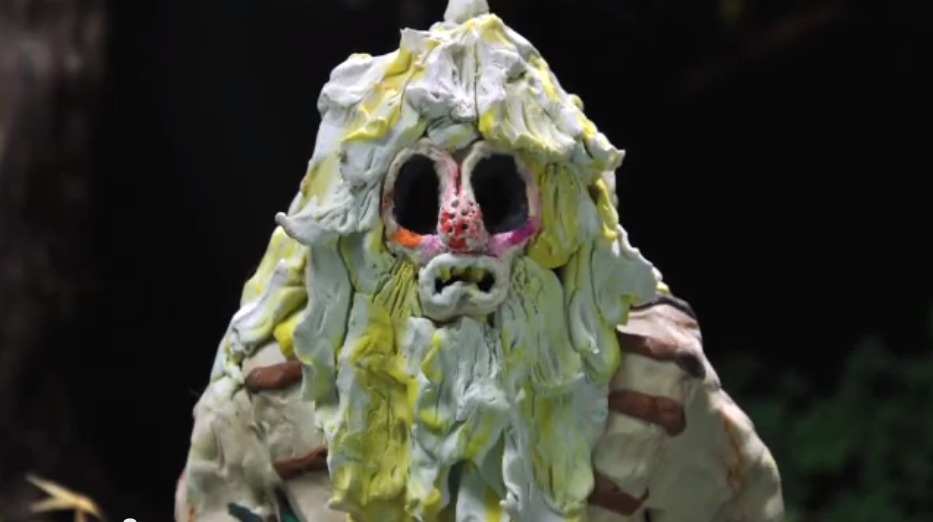
Model simple clay characters that match your sketches.
Step 8
Place props and characters onto the set in the starting pose for your first scene.
Step 9
Set up the lamp or flashlight so the set is brightly and evenly lit.
Step 10
Take the first photo of your scene to capture the starting pose.
Step 11
Move one character a tiny amount to create the next pose.
Step 12
Take another photo of the new pose to add a frame to your claymation.
Step 13
Repeat moving one tiny step and then taking a photo until your story reaches its ending.
Step 14
Play your photos as a fast slideshow on your device to check the motion and make small fixes if needed.
Step 15
Share your finished claymation on DIY.org
Help!?
What can we use if we don't have modeling clay, a shoebox, or a lamp?
Use play-dough or air-dry clay in place of modeling clay, fold a cereal box open the same way as the shoebox set, and substitute steady daylight from a window for the lamp/flashlight while you model simple clay characters, build your set, and attach the background.
If my clay characters keep falling over or photos are blurry, what should I do?
Push toothpicks or wire into the bases of your clay characters as anchors and press them into the shoebox floor, steady your camera with a stack of books or a tripod, and use the lamp/flashlight to create even light before taking each photo and tiny movement step.
How can I adapt this claymation project for different ages?
For younger children simplify the task by using store-bought figures and a two-part story with an adult helping to set up the shoebox and take photos, for elementary kids follow the three-part story and model simple clay characters, and for older kids increase frames, detailed props, and editing when you play your photos as a fast slideshow.
How can we make the claymation more interesting or personal?
Attach painted or patterned colored paper backgrounds, build extra small handmade props and anchors from clay as in the instructions, record voiceovers or sound effects to play with the slideshow, or use a stop-motion app for smoother motion before sharing your finished claymation on DIY.org.
Watch videos on how to make a short claymation film
HOW TO MAKE A CLAYMATION | | For Kids!
4 Videos
HOW TO MAKE A CLAYMATION | | For Kids!

Stop Motion at home with Kiri and Lou - part one
Claymation Characters: From Concept to Character - with 3d Printed Armature Stop Motion Tutorial
How to Make a Claymation Character | Easy Stop Motion Tutorial
Facts about stop-motion animation for kids
🎥 The earliest stop-motion experiments date back to the late 1800s — filmmakers have been making objects move frame-by-frame for over a century!
🧩 Many clay characters have tiny wire armatures inside so they can hold poses and be posed smoothly between frames.
⏱️ Full-motion film runs at 24 frames per second, but claymation often uses 12 fps to halve the work while still looking delightfully smooth.
🏆 British studio Aardman Animations won an Academy Award in 1994 for the Wallace & Gromit short "The Wrong Trousers."
📱 You can create stop-motion clay films today using a smartphone or tablet and free apps — no fancy camera needed!
How do you make a short claymation film?
What materials do I need to make claymation?
What ages is claymation suitable for?
What are the benefits of making claymation for children?
