Paint a color wheel
Paint a color wheel using primary paints, mix to create secondary colors, observe color relationships, practice brush control, and label each segment.


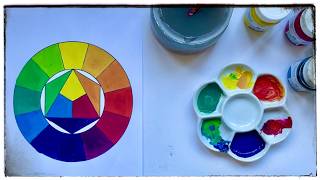
Step-by-step guide to paint a color wheel
Step 1
Gather all the materials listed and set them on a clean table.
Step 2
Put the paper flat and trace a large circle with the round object and pencil.
Step 3
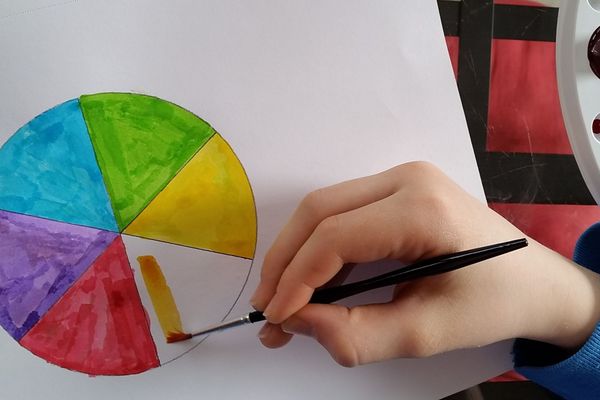
Draw three straight lines through the center of the circle to divide it into six equal slices.
Step 4
Squeeze small blobs of red paint blue paint and yellow paint onto separate spots on your palette or plate.
Step 5
Paint three alternating slices with the primary colors red yellow and blue using short controlled brush strokes.
Step 6
Take a clean brush and mix red and yellow on the palette until you see orange.
Step 7
Paint the slice that sits between the red and yellow slices with the orange you mixed.
Step 8
Take a clean brush and mix yellow and blue on the palette until you see green.
Step 9
Paint the slice that sits between the yellow and blue slices with the green you mixed.
Step 10
Take a clean brush and mix blue and red on the palette until you see purple.
Step 11
Paint the slice that sits between the blue and red slices with the purple you mixed.
Step 12
Let your color wheel dry completely before writing on it.
Step 13
Use the black marker to label each slice with its color name (red orange yellow green blue purple).
Step 14
Look at your finished wheel and point out which three are primary and which three are secondary and which colors sit opposite each other.
Step 15
Share your finished color wheel on DIY.org
Help!?
If I don’t have the exact materials, what can I substitute for the round object, palette, or paints?
Trace a cereal bowl, mason jar lid, or CD for the circle, use a paper plate or disposable lid as your palette, and swap in washable tempera or poster paints in red, blue, and yellow if the specific paints aren’t available.
What should I do if colors start to look muddy or paint bleeds between slices while following the mixing and painting steps?
Rinse and dry your brush between mixes, always mix new colors fully on the palette before painting the adjacent slice, and let each painted slice dry completely before painting the next to prevent muddiness and bleeding.
How can I adapt this color wheel activity for younger children or older kids who want more challenge?
For younger kids pre-trace the circle and draw larger, thicker slices and provide big brushes and washable paints while parents do the cutting/line-drawing, and for older kids increase to 12 slices to add tertiary colors, practice tints/shades by adding white or black on the palette, and ask them to label complementary/opposite relationships.
What are simple ways to extend or personalize the finished color wheel beyond the basic instructions?
Create a 12-slice wheel by mixing tertiary colors on the palette, experiment with tints by adding small amounts of white or black to slices, write names and color relationships with the black marker, then varnish or laminate the wheel for display or sharing on DIY.org.
Watch videos on how to paint a color wheel
How to Paint an Accurate COLOUR WHEEL (Step by Step)
4 Videos
How to Paint an Accurate COLOUR WHEEL (Step by Step)
Super Easy Colour Wheel | Beginner-Friendly! | 5 Minutes
How to paint a color wheel and what you learn from it!
How to Paint a COLOR WHEEL (Step by Step) - using three colours only
Facts about color theory and painting for kids
🎨 Traditional painting primaries are red, yellow, and blue — mix them to start the whole wheel!
🧪 Mix two primaries to make secondaries: red + yellow = orange, yellow + blue = green, blue + red = purple.
🧭 Opposite colors on the wheel are called complementary; placed side-by-side they make each other look brighter.
🕰️ Johannes Itten, a famous art teacher, helped popularize a color wheel and taught color relationships to artists.
🖌️ Painting a color wheel is super practice for brush control, mixing consistent hues, and labeling what you made.
How do I paint a color wheel with my child step by step?
What materials do I need to paint a color wheel at home?
What ages is painting a color wheel suitable for?
What are the benefits of having my child paint a color wheel?
