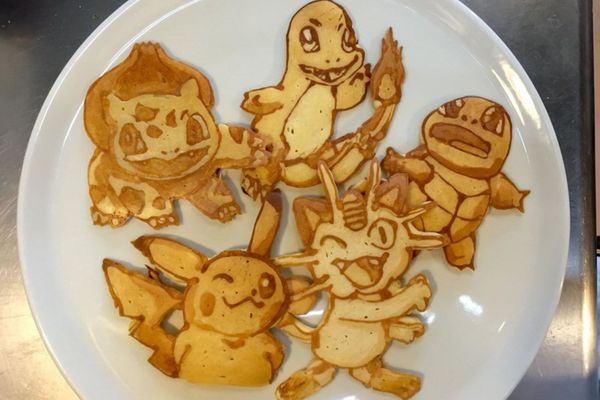
Make pancake art
Make pancake art by pouring batter into fun shapes using squeeze bottles on a nonstick pan, practicing designs and cooking safely with adult supervision.


Step-by-step guide to make pancake art
Step 1
Wash your hands and bring all Materials Needed to your workspace.
Step 2
Ask an adult to preheat the nonstick pan on medium-low heat.
Step 3
Pour some pancake batter into a small bowl for each color you plan to use.
Step 4
Add a drop of food coloring to each bowl and stir until the color is even.
Step 5
Use a measuring cup to carefully pour each colored batter into its own squeeze bottle.
Step 6
Have an adult lightly grease the heated pan with cooking spray or a little oil.
Step 7
Practice squeezing lines and simple shapes onto a plate or piece of parchment to learn the pressure you need.
Step 8
Squeeze a simple outline of your design directly onto the hot pan.
Step 9
Squeeze more batter to fill in the outline of your design.
Step 10
Add small details using gentle squeezes and different colors as you like.
Step 11
Cook the pancake until small bubbles appear on the surface and the edges look set about 1–2 minutes.
Step 12
Ask an adult to flip the pancake with a spatula.
Step 13
Cook the pancake on the flipped side for another 30–60 seconds.
Step 14
Transfer the pancake to a plate and let it cool a little before eating.
Step 15
Share your finished pancake art on DIY.org.
Help!?
What can I use instead of squeeze bottles if they're hard to find?
If you don't have squeeze bottles, use a clean plastic ketchup bottle, pour carefully from the measuring cup with a small funnel, or fill a zip-top bag and snip a corner to dispense the colored batter just like the squeeze bottles.
My pancake lines are spreading and losing shape on the pan—how do I fix that?
Make sure an adult preheated the nonstick pan to only medium-low and lightly greased it, practice pressure on parchment as the instructions say, and if lines still spread, thicken the batter slightly or let the pan cool a bit before squeezing outlines so they hold shape.
How can I adapt this pancake art activity for younger toddlers or older kids?
For toddlers, have an adult squeeze simple outlines on the hot pan and let them fill with one color or add sprinkles, while older kids can follow all steps independently, use multiple colors and finer details practiced on parchment, and manage the flip with adult supervision as needed.
What are some fun ways to extend or personalize my pancake art after I've made the basic design?
Enhance your design by adding chocolate chips, fruit, or edible markers for small details, try natural food colorings, use stencils or themed outlines, and don't forget to photograph and share your finished pancake art on DIY.org as the instructions suggest.
Watch videos on how to make pancake art
How to Draw Cartoon Pancake and Syrup Breakfast Cute and Easy
4 Videos
How to Draw Cartoon Pancake and Syrup Breakfast Cute and Easy

CUTE PANCAKE ART || Recipes For Beginners
Classroom Activities for Pancake Day | How to Make Pancakes | Twinkl
Kids Try Pancake Art | Kids Try | HiHo Kids
Facts about cooking and kitchen safety for kids
🥞 Pancakes are one of the world's oldest cereal foods—ancient Greeks made 'tagenites', a pancake-like treat flavored with cheese and honey.
🍁 It takes about 40 liters of maple sap to make 1 liter of maple syrup, the classic sweet topping for pancakes.
🔬 Teflon and other non-stick coatings (discovered accidentally in 1938) make it much easier to cook pancake art without sticking.
🎨 Pancake art batter is usually thinned a bit—more like crêpe batter—so it flows smoothly through squeeze bottles for detailed designs.
🏃♀️ The Olney Pancake Race in England is a long-running tradition (claimed since 1445) where contestants run while flipping pancakes in a pan.
How do I make pancake art with squeeze bottles on a nonstick pan?
What materials do I need for pancake art?
What ages is pancake art suitable for?
What are safety tips, benefits, and fun variations for pancake art?
