Stage a fashion photoshoot
Plan and stage a mini fashion photoshoot using clothing, props, and a camera or phone. Practice styling, posing, lighting, and teamwork.


Step-by-step guide to stage a mini fashion photoshoot
How to Pose Families During a Photoshoot | B&H Event Space
Step 1
Pick a fun theme for your photoshoot such as vintage superhero rainbow party or fancy dress.
Step 2
Choose one outfit and matching accessories that fit your theme.
Step 3
Gather three to five props that help tell your theme story.
Step 4
Hang the sheet or paper backdrop on a wall using tape or clothespins.
Step 5
Place the backdrop near a window or point a lamp at it to create bright soft light.
Step 6
Put a chair or small box where the model will stand or sit.
Step 7
Assign roles to your helpers like model photographer and stylist.
Step 8
Practice three different poses in front of the backdrop to find your best moves.
Step 9
Take two quick test photos to check how the light and backdrop look.
Step 10
Look through the test photos to spot anything that needs fixing.
Step 11
Make one small change like moving the light shifting a prop or adjusting the outfit.
Step 12
Take a series of final photos trying new poses angles and facial expressions.
Step 13
Choose your three favorite photos from the final set.
Step 14
Make a simple edit to each favorite photo such as cropping or brightening it.
Step 15
Share your finished fashion photoshoot on DIY.org
Help!?
What can we use instead of the sheet or paper backdrop if we can't find one?
If you don't have a sheet or paper backdrop, hang a clean blanket or curtain with tape or clothespins or use a plain wall or a large poster board as the backdrop.
My test photos show harsh shadows or the backdrop looks dull—what should we fix?
If the two quick test photos show harsh shadows or dim light, move the chair closer to the window or angle the lamp toward the backdrop and use a white poster board or sheet as a reflector to soften the light before retaking test photos.
How do we adapt this photoshoot for different ages?
For younger kids simplify roles to model and helper and practice one easy pose with big, safe props, while older kids can assign model, photographer, and stylist, try three different poses, and do the cropping/brightening edits themselves.
How can we make the photoshoot more creative or personal after taking the final photos?
Extend the activity by making extra DIY props and themed accessories, planning a short storyboard for the final photo series, trying new angles in the final photos, then pick and crop/brighten your three favorites and share them on DIY.org.
Watch videos on how to stage a mini fashion photoshoot
19 Creative Photoshoot Ideas for Kids
4 Videos
19 Creative Photoshoot Ideas for Kids
Child Boys Pose for Photoshoot 🔥 | Childhood Pose ideas, Photographers Mind
The Fundamentals of Fashion Photography with Shavonne Wong - Promo
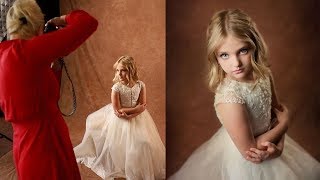
PORTRAIT PHOTOGRAPHY in studio, kids portrait photoshoot with little princess behind the scenes
Facts about children's photography and styling
📸 A single fashion photoshoot can produce dozens to hundreds of images — photographers later edit to find the perfect few.
👗 Swapping one accessory (like a hat, belt, or scarf) can completely change the story an outfit tells on camera.
💡 Three-point lighting (key, fill, back) is a classic studio trick that sculpts faces and separates subjects from backgrounds.
🤝 Even a mini photoshoot benefits from teamwork — a photographer, stylist, and at least one helper make setups faster and more fun.
🎭 Small posing tweaks — chin slightly up, shoulders back, weight on one leg — can make a subject look taller and more confident.
How do I stage a mini fashion photoshoot with my child?
What materials do I need for a kids' fashion photoshoot at home?
What ages is this fashion photoshoot activity suitable for?
What are the benefits and safety tips for staging a kids' fashion photoshoot?
