Build a photo studio
Build a simple home photo studio using cardboard, fabric backdrop, lamps with diffusers, a tripod substitute, and props to learn lighting, composition, and photography basics.


Step-by-step guide to build a photo studio
How To Set Up A Home Photography Studio + Equipment You Will Need (COMPLETE BEGINNERS GUIDE)
Step 1
Clear a flat table or floor near an electrical outlet so you have a safe spot to build your studio.
Step 2
Lay the cardboard flat on the table or floor to make a smooth base for your photos.
Step 3
Attach the fabric sheet behind the cardboard using tape or clothespins so it makes a clean backdrop.
Step 4
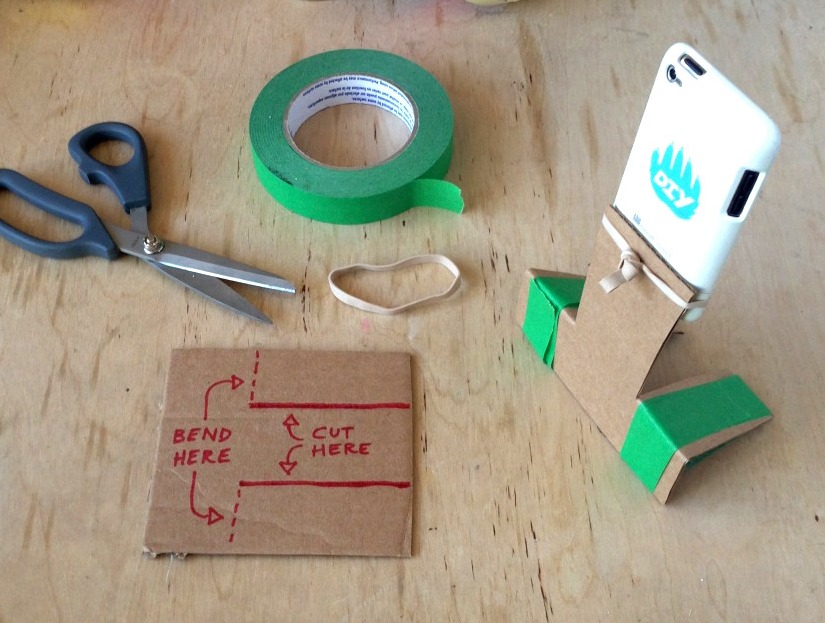
Make a tripod substitute by stacking books or using a sturdy box and make the top flat and steady.
Step 5
Place one lamp on the left side of the cardboard to be your main light source.
Step 6
Place the second lamp on the right side of the cardboard to act as a fill light.
Step 7
Cover each lamp with a sheet of tissue paper or a thin white cloth to make a soft diffuser.
Step 8
Put your camera or phone on the tripod substitute and point it at the cardboard base.
Step 9
Arrange your props on the cardboard to design a fun scene for your photo.
Step 10
Take one test photo of the scene to see how it looks through the camera.
Step 11
Look at the test photo and notice any harsh shadows or if the subject is too big or small in the frame.
Step 12
Move one lamp or one prop a little to change the light or improve the composition.
Step 13
Take your final photo and check that the lighting and composition look great.
Step 14
Share your finished creation on DIY.org
Help!?
What can we use if we don't have two lamps, a fabric sheet, or tissue paper listed in the materials?
Use a single desk lamp plus your phone's flashlight or another desk light as the second lamp, hang a white bedsheet or poster board behind the cardboard for the backdrop, and replace tissue paper diffusers with parchment paper, a thin cotton pillowcase, or white printer paper.
My tripod substitute (stacked books) keeps wobbling or the lamps make harsh shadows—how can we fix those problems?
To steady the tripod substitute in step 4, tape the books together and place a flat board on top, and to reduce harsh shadows in steps 5–12, move a lamp farther away, fully cover the lamp with the tissue/parchment diffuser, or add a white poster board reflector opposite the main light.
How can I adapt the activity for a preschooler, an elementary-age child, or a teenager?
For preschoolers, have an adult handle the electrical setup and tripod in steps 1–7 while the child arranges props and presses the shutter in steps 8–10; for elementary kids, let them attach the backdrop, set up diffusers, and take test photos; for teens, challenge them to build a sturdier tripod substitute, experiment with lamp placement and DIY reflectors, and refine lighting/composition through multiple test photos.
What are some creative ways to improve or personalize our photo studio beyond the basic setup?
After arranging props in step 8, personalize the studio by decorating the cardboard base and fabric backdrop, add colored gels using translucent folders over the lamps, build a reflector from aluminum foil on cardboard to bounce light, or create themed miniature scenes and edit the final photo before sharing on DIY.org.
Watch videos on how to build a photo studio
Product Photography At Home: Beginner to Intermediate Photography Tips | 3 Quick Tips
4 Videos
Product Photography At Home: Beginner to Intermediate Photography Tips | 3 Quick Tips
Best Starter Lighting Kits for Beginner Studio Photographers
How to Build a HOME PHOTOGRAPHY STUDIO in a SMALL PLACE!

The Three Light Setup - Studio Lighting for Beginners | Mark Wallace | Exploring Photography
Facts about photography for kids
📷 The oldest surviving photograph, "View from the Window at Le Gras" (1826), needed hours of exposure—early photographers had to be very patient!
💡 Simple diffusers like a white sheet or tracing paper scatter light and soften harsh shadows just like professional softboxes.
📦 Cardboard is recyclable, cheap, and can be turned into reflectors, flags, or lightweight softbox frames for a kid-friendly studio.
🎨 The rule of thirds (imagining a tic‑tac‑toe grid) helps make photos more balanced and interesting to the eye.
📚 A stack of books, a cookie tin, or a bean bag can be a safe tripod substitute to keep your camera steady and reduce blur.
How do I build a simple home photo studio with my child?
What materials do I need to set up a DIY photo studio at home?
What ages is building a home photo studio suitable for?
What are the benefits and safety tips for a kids' home photo studio?
