Trick us with an optical illusion photo
Make an optical illusion photo using household objects and a smartphone or camera, experimenting with perspective, angles, and lighting to trick viewers’ perception.


Step-by-step guide to make an optical illusion photo
Step 1
Pick one small toy or object to be the star of your optical illusion.
Step 2
Spread the plain sheet or blanket flat to make a clean background.
Step 3
Put the book or box on the background to make a raised platform.
Step 4
Place your toy on the platform so it sits steady.
Step 5
Arrange the cup or bowl and spoon near the toy as extra props for the trick.
Step 6
Cut or fold a paper shape if you want a fake distant object and tape it where it can line up with your toy.
Step 7
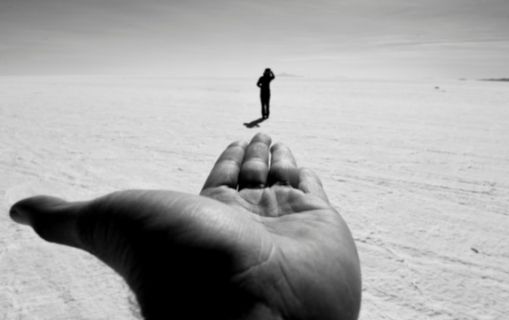
Move your camera close to the toy and aim it so the toy lines up with a real or paper object farther away to create forced perspective.
Step 8
Turn on the lamp or flashlight and move it to make shadows or highlights that help the illusion.
Step 9
Take 3 to 6 photos from slightly different positions and angles to try different tricks.
Step 10
Open your favorite photo and crop or brighten it until the illusion looks its best.
Step 11
Upload and share your finished optical illusion photo on DIY.org
Help!?
What can I use if I don't have a plain sheet, book, or lamp listed in the materials?
Use a large plain poster board or a plain wall instead of the sheet or blanket, stack magazines or a shoebox instead of the book/box for the raised platform, and use your phone's flashlight in place of the lamp.
My toy keeps tipping over or the illusion doesn't line up—what should I try?
If the toy won't sit steady, tack its base with a bit of tape or modeling clay on the book/box, then move the camera closer or farther and adjust the taped paper shape and lamp position until the toy lines up and the shadows help the trick.
How can I adapt this activity for different age groups?
For preschoolers have an adult set up the book/box and props and let them place the toy and take one photo, for elementary kids let them cut or fold the paper shape and try 3–6 angles, and for older kids encourage advanced angle experiments and photo edits like cropping and brightening.
How can we make the illusion more creative or shareable?
Personalize the scene by creating themed paper cutouts, add colored light with a lamp or filtered flashlight, take multiple staged photos for a mini stop-motion, then crop/brighten your best shot and upload it to DIY.org with a fun caption.
Watch videos on how to make an optical illusion photo
What is an Optical Illusion? | Optical Illusions Explained for Kids | Optical Illusions for Kids
4 Videos
What is an Optical Illusion? | Optical Illusions Explained for Kids | Optical Illusions for Kids
Art For Kids Optical Illusions Step by Step Art Tutorial for Young Artists
Art Lessons For Kids: Optical Illusion Pt1
Sight and Optical Illusions| LEARNING WITH SARAH | Educational videos for Kids
Facts about photography for kids
🌀 Optical illusions can make still pictures look like they’re moving because your brain guesses motion from contrast and edges.
🎬 Filmmakers used forced perspective in The Lord of the Rings to make hobbits look smaller without relying on CGI.
🧭 Anamorphic art is purposely distorted so it only looks correct from one special viewpoint — stand in the right spot and the magic appears.
💡 Lighting and shadows are often the secret: the right shadow can make two separate objects seem connected or floating.
📱 You can create strong perspective tricks with just a smartphone — wide-angle lenses exaggerate distance and size differences.
How do you make an optical illusion photo with household objects and a smartphone?
What materials do I need to make an optical illusion photo at home?
What ages are optical illusion photos suitable for?
What are the benefits of making optical illusion photos with kids?
